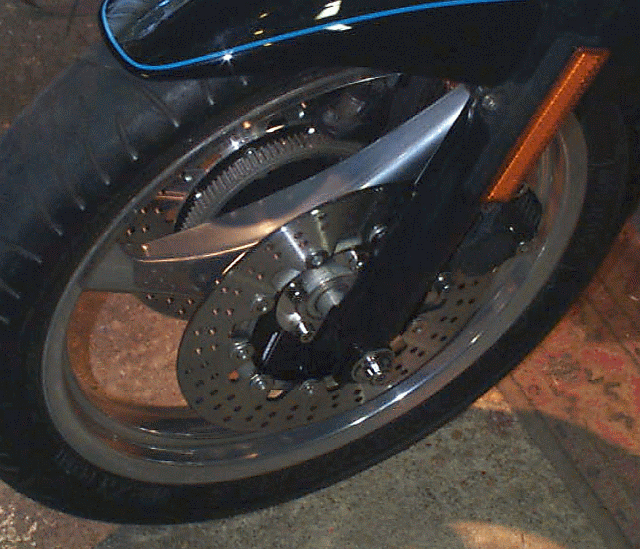
Braking Rotors
The problem: grabbing (shudder) of the brake at certain speeds (most noticeable between 20-40MPH)
The cause: While it is possible that warping of the rotor could cause this problem, I don't think in my case it was warping. I believe it was a hard spot in one or both of the rotors (I suspect both since the frequency changed when I modified the orientation of the rotors to each other). This can be caused by really hot pads staying in contact with the rotor when stopped, and I believe is more likely to happen with pads such as the sintered bronze pads the former owner had installed. In the center of each of the sintered bronze pads was a bright blue heat spot, to me indicating localized overheating. To remove the hard spot in the rotor would require resurfacing the rotors. I did check the rotors for warpage (both on the wheel in a wheel stand, and on the bike) - and found they were well within BMW spec (BMW allows 0.008" - I measured about 0.002").
The tries to cure it:
- Tried new pads - the former owner had installed Dunlopad (DP) Sintered
Bronze pads to reduce dust. I installed new stock pads. It helped, but
didn't cure it. The new pads do not show the bluing the sintered bronze pads
do.
- Tried re-indexing the rotors to the wheel (i.e. - rotate in
relative position to each other) -
changed the frequency, but didn't cure it.
- Tried getting the rotors resurfaced (they showed almost no noticeable wear) - can't be done IMHO. Tried it in a flywheel grinder, but there is no way to accurately line up the center carrier boss that contacts the wheel, so the grinding results in an even worse wobble (luckily, I had a 'dud' rotor to try this on). Tried using a precision auto-brake lathe, but again, impossible to get a really good alignment to the carrier, and the lathe doesn't like cutting stainless with slots in it. Dulled the tool, and produced chatter marks on the surface.
What I finally did:
- Ordered replacement "Braking" rotors - which mount to the existing carriers after removal of the old rotor. I had used a Braking rotor on the old FYK before the ABS conversion for the rear rotor and it worked fine. Cost of a pair of these rotors is about the cost of a single BMW replacement rotor. It is a cost-effective cure if you do the work yourself. These are also semi-floating rotors, so theoretically they self-align to the calipers.
How to do this:
- First - order the Braking rotors <http://www.braking.com/Eng/Index.htm>
(the website is pretty, but not terribly effective for ordering or even
finding specifications) - ask your dealer to look in the Tucker-Rocky
catalog. You want the rotors listed for K models from 1984 until the ABS
came out (and you can use them with ABS - just a little trick or two
required)
- Remove the carrier and rotors from the wheel. Remove wheel (first take bolts out of calipers and move them out of the way), then unbolt the old carrier/rotor. If you have ABS - note which side of the wheel it is located on (d'uh)
- Clamp old rotor in a vice (clamping only on the old rotor surface) - and
from the rotor side, grind off the rivet head (an air powered form-grinder
works well). Grind below the surface of the rotor (the heads mash into the
rotor a bit) - then using a punch, punch the rivet out. Repeat for all
rivets and the carrier is now free. Throw old rotors in the trash.
- If you have ABS - before doing this - you must coax the tone-ring off the
carrier. I did this using some large levers and very carefully working all
the way around the ring - being very careful to not cock the tone ring (I've
heard of people breaking it). If it is very resistant to removal - heating
it gently and evenly with a propane torch should help it come loose (don't
heat the carrier - the idea is for the ring to expand in size).
Alternatively - you could try freezing the entire thing and seeing if the
carrier shrinks more than the tone ring.
- On the non-ABS side - use provided bolts/nuts/springs/spools to bolt new
rotor to the carrier. Tighten the bolts snuggly (they don't give a torque
spec, but they are self-locking nuts).
- On the ABS side - again use the provided hardware. When done tightening
all the bolts/nuts - use your grinder to just shave off the part of the bolt
that protrudes beyond the nut - and the non-locking part of the nut (above
the plastic nylock). This will allow clearance to put the tone ring back on.
- To install the tone ring - put the disk/carrier in the freezer for a few
hours - or in a pile of snow (as I did - did I mention I hate snow?) for 15
minutes. You want it COLD. Heat the tone ring (I used a kero-heater) until
it is decidedly uncomfortable to touch. These two steps will allow the
carrier to shrink due to cold, and the tone ring to expand. It should drop
right on, but you must do this quickly before the heat/cold gets
transferred. Put the 3 screws back in that hold it in place.
- Remount the new carrier/rotor assemblies to the front wheel.
Mount ABS side to ABS side (d'uh).
- Reinstall the front wheel.
- Check function of ABS. I did this by starting the bike
while my jack was still under the engine and letting transmission oil drag
spin the rear wheel, then spinning the front wheel by hand. ABS check lights
went out, so the ABS clearance was maintained.
- Ride it (I haven't gotten to doing this yet since the ground/roads have been snow covered since I did this. I hate snow!)
Result is: